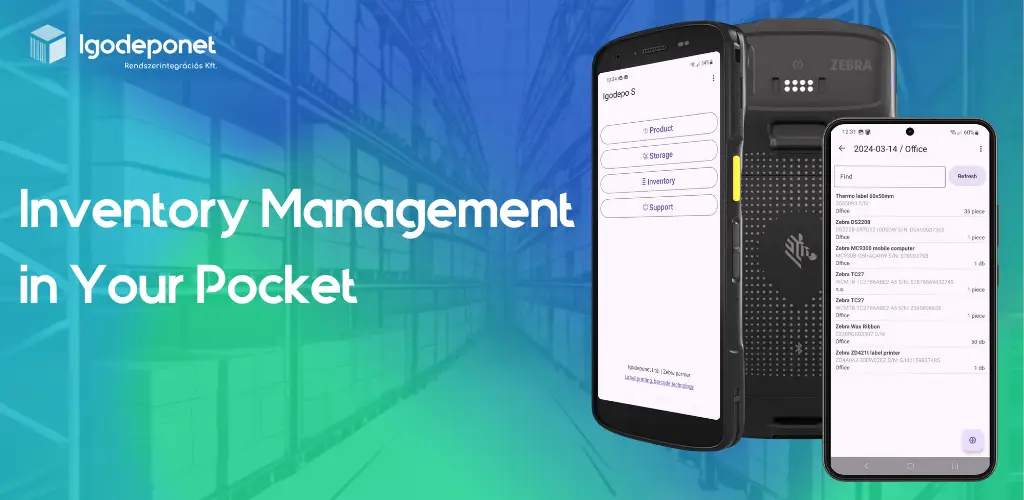
Igodepo S user manual
Igodepo S is a user-friendly, no-cost inventory application designed for swift and effective inventory management using your smartphone or data collection device. Whether you operate a small business or manage a large warehouse, Igodepo S streamlines the inventory process, enhancing efficiency. Experience the simplicity and effectiveness firsthand with our complimentary Android app – try it now!
Getting started
Register Item(s)
Within the “Products” menu, you can add a new product into the database by following these steps.
- Press the Plus button to add the new product to the list.
- Within the displayed interface, utilize the barcode icon to scan the ID (barcode) of the desired product for addition.
- Fill in the following additional fields:
- Product name
- Default unit of measurement
- Default unit of quantity
- By activating the “Unique” field, you enable the option to assign a unique identification number to these products during inventory list addition, e.g. internal material number, serial number, etc.
- Save the product by selecting the “Save” button.
Additionally, you have the option to bulk import products via Excel by accessing the three dots located at the top right corner and clicking on “Upload”.
Create storage(s)
Within the “Storage” menu, you can incorporate a new storage area into the database by selecting the icon located at the bottom right corner, akin to the process in the “Products” menu.
To add a new repository:
- Click on the plus button positioned at the bottom right corner.
- Enter the name for the repository in the designated field.
- Upon clicking the Save button, the new repository will be included.
- You can modify the repository name by clicking on the storage area again.
The application supports the addition of an unlimited number of storage spaces, which can be edited anytime. Additionally, you have the option to bulk import storages via Excel by accessing the three dots located at the top right corner and clicking on “Upload”.
Inventory process
Create / Edit / Save Inventory List
In the “Inventory” menu, to add a new inventory list to the database, click on the icon located at the bottom right corner. The inventory list is initially named based on the creation date, but it can be renamed as needed. Similar to products and storage, you can create an unlimited number of inventory lists, which can be edited at any time.
Once you’ve selected an inventory list:
Click on the three dots situated in the top right corner to access the following options.
- Edit the inventory list name.
- Delete an inventory list.
- Press the “Save Inventory List” button to export all items in the list to an Excel file. The file will be saved in the folder specified by the system.
Start Inventory
To record items in the inventory list, follow these steps:
-
Add Items: Open the inventory list and press the plus button located in the bottom right corner to add desired items.
-
Scan Product IDs: When adding a product, you can either press the barcode icon to scan product IDs manually or use the Mobile Computer (Barcode scanner) device to scan barcodes automatically.
-
Scan Unique Identifiers: For products with unique identifiers, ensure to scan the unique identifier as well.
-
Enter Quantity: Input the quantity to be inventoried or leave the default quantity.
-
Select Storage Location: Choose the storage location where the items will be stored. The system will automatically load the previously selected storage location for the next batch, but you can change it anytime during the recording.
-
Toggle Items: Utilize the On (+) / Off (-) slider to add or remove items from the list, in case of errors, intermediate goods issue, or other activities.
-
Save Item: Once all necessary data is entered, press the “Save” button to add the product to the list.
In the data collection tool, you can enable the instant save function using the slider. This feature automatically saves the item as soon as the identifier is read, allowing for seamless scanning of the next product.
Item movement
To move items within the inventory list, follow these steps:
Select Item: Click on the item within the inventory list that you want to move or delete.
Move or Delete: After selecting the item, you can choose to either move or delete it.
Initiate Move: If you choose to move the item, click on the “Move” button.
Enter Movement Data: On the next page, enter the necessary movement data.
Choose Storage Location: Choose the destination storage location for the item.
Enter Quantity: Specify the quantity of the item to be moved.
Confirm: Once all details are entered, confirm the movement to complete the process.
Custom settings
To access the settings menu, about and delete database options, follow these steps.
Settings:
- Application Language: Choose between English or Hungarian.
- Enable Quick Search: Toggle this option to allow quick and easy searching within the application. After entering three characters, the system will continuously narrow down the results list until the desired item is found.
Delete Database:
- Deleting the database removes all previously recorded products, storage, and inventory data permanently from the system.
- These deletions cannot be undone. It’s recommended to back up the inventory data before proceeding with database deletion.
Is it possible to delete existing data?
All data within the application can be deleted by clicking on the three dots located in the top right corner of the main menu. It’s crucial to understand that deleting a database will erase all previously recorded data, and this action cannot be undone.
Is it possible to export the data entered during the inventory?
All inventory data can be exported by clicking on the three dots in the top right corner after selecting the inventory list. The inventory data is exported in an Excel file.
Is there a possibility for custom development?
For a complimentary consultation tailored to your company’s specific needs, please don’t hesitate to reach out to us or send an email to info@igodepo.hu. At Igodeponet Ltd., our primary objective is to assist businesses in optimizing their warehousing, logistics, and manufacturing processes. We achieve this by offering ready-made or customized software solutions designed to meet your unique requirements.
Is it possible to use the system offline?
The application saves the data locally on the device, so it can be used offline without any internet connection/network.
What devices can be used with?
The Igodepo S app is compatible with all types of smartphones and data collection (Mobile Computer) devices running the Android operating system.
All features are free?
All current features of the Igodepo S application are free of charge, but it is possible to request custom development for your company.